 By
·
9 minute read
By
·
9 minute read
In a recent project, our customer wanted to test drive multiple cloud databases to understand how they would suit their needs. We used Agile Data Engine to duplicate the dataflows to Snowflake and BigQuery, the two target databases that our customer wanted to explore. The duplication meant that we created identical data structures, models, and workflows for the different databases simultaneously.
In this blog post, I will make a technical deep dive into how to build and deploy to Snowflake and BigQuery using Agile Data Engine. I will go through the configuration, development, deployment, and the steps we took to make it happen. However, I will not provide any product or performance comparison between the two.
What is multi-cloud, and why should it matter?
In 2019, Gartner predicted that by 2022, 75% of enterprise customers using infrastructure as a service (IaaS) would adopt a deliberate multi-cloud strategy. They reasoned that many customers would want to use best-in-class services from multiple cloud providers. [1] The customers want the flexibility of the unique offering of different cloud vendors while using the best tool for the job.
In practice, the multi-cloud strategy could mean that a customer has Google Cloud components set up with Terraform and AWS components set up either with Terraform or CDK. If, for example, the customer wants to load data from their cloud platform specific applications to their analytical databases, they could use Cloud Storage as the data source for their BigQuery and Snowflake and Amazon's S3 as the data source for Snowflake.
Both Google and Snowflake have taken steps to allow efficient multi-cloud setups. For example, Snowflake has branded itself as a multi-cloud and cross-cloud player in the market [2]. The approach is apparent when using Snowflake: you can load data almost from any Cloud vendor's cloud storage, such as Cloud Storage, S3, or Azure Data Lake Storage. Google has also taken steps towards a multi-cloud strategy with its BigQuery Omni for multi-cloud analytical workloads [3]. Clearly, there is a need for businesses to utilize data from multiple cloud providers.
Why multi-cloud?
We know that different customers have different needs for adopting multi-cloud, but let's throw out some possible scenarios for these multi-cloud setups. Whatever the business needs, multi-cloud can offer flexibility in the landscape, even though the architecture may become a bit more complex.
For example, a customer might need a multi-cloud data platform because of regulatory purposes or company policies. BigQuery is available in Finland, whereas Snowflake is available in mainland Europe. Sometimes the customer still would like to use both databases but can only partially move their data outside Finland. In this case, a multi-cloud setup would offer flexibility.
Agile Data Engine has been made from day one to be multi-cloud compatible with various cloud data platforms, such as Snowflake, BigQuery, Synapse, and Azure SQL database. The compatibility has been vital in supporting different business needs on different cloud platforms. In addition, Agile Data Engine provides automatic tools, such as schema management, data modeling, and load generation, regardless of the chosen target cloud database. The automation makes it possible to run, build and even duplicate workloads to multiple cloud data platforms with minimal effort.
The example case: Test drive Snowflake and BigQuery with identical data pipelines
With our customer, the case was not simply "let's load a couple of tables and compare the performance of the two." There was an actual cloud data warehouse to be done, although quite a small one. In practice, this meant:
- Data ingestion layer with data from multiple source systems
- Data storage layer modeled with Data Vault
- Data publish layer with Kimball's dimensional model
We duplicated this whole 3-layer data warehouse to both Snowflake and BigQuery. So, in the end, we had a complete data warehouse with data from multiple source systems, in both target databases, and with a usable Publish layer for reporting purposes. Thanks to the high-level automation that Agile Data Engine provides, this was a relatively easy undertaking, despite the complexity.
Agile Data Engine generated most of the SQL DML and DDL to either Snowflake or BigQuery. Sure, there were SQL dialect differences between the two. These SQL differences had to be mainly considered in the few steps when the SQL was developer-written, such as in the business logic intensive publish layer.
I will not present the actual customer case in this blog post. Instead, this example case is a version of the solution using Microsoft's excellent AdventureWorks sample database. The steps we took in our customer case can be done and explained with this sample dataset.
Technical deep-dive
In this section, we will dive deeper into the technical side of how to implement the presented use case. First, I'll start with target database connections and move on to the common naming conventions you should use in these cases. After that, I'll explain the development phase with data ingestion, data warehousing, and publish layer.
Connections
To set up Snowflake and BigQuery for Agile Data Engine, we will need the following things:
| Snowflake | BigQuery |
|
Google Cloud Service account, with:
|
For Snowflake, we will also need the URL to the Snowflake account. For BigQuery, we need to use service account email and project ID for connection setup. After setting these up, we can connect Agile Data Engine to these target databases.
Naming conventions
To separate Snowflake and BigQuery workloads from each other, we will be using the following package naming conventions:
| Package postfix | Example | Target database |
| _SF | STG_ADVENTUREWORKS_SF DV_SALES_SF |
Snowflake |
| _BQ | STG_ADVENTUREWORKS_BQ DV_SALES_BQ |
BigQuery |
Based on these package postfixes, Agile Data Engine will build and deploy specified tables and loads to correct target databases and generate Workflow Orchestration jobs.
At the schema and entity level, we will use prefixes sf_ and bq_ for schemas to separate Snowflake and BigQuery workloads from each other. The naming conventions are the following for schemas:
| DW zone | The naming convention for schema | Examples |
| SOURCE | <prefix>_SRC | SF_SRC, BQ_SRC |
| INGESTION | <prefix>_STAGING | SF_STG, BQ_STG |
| RAW | <prefix>_DV | SF_DV, BQ_DV |
| INFORMATION_DELIVERY | <prefix>_PUB | SF_PUB, BQ_PUB |
Agile Data Engine requires a unique schema and entity name combination. However, entity names can be identical in both workflows thanks to the naming convention used for schemas.
Development
In this example case, we will duplicate the same data pipeline to two separate target databases. In a nutshell, this will mean duplicating the same implementation to two separate instances. So how should one create an identical pipeline to separate target databases? The answer: do it once and clone the implementation to another database. With Agile Data Engine, this is pretty easy.
Data ingestion
First, we will create the package STG_ADVENTUREWORKS_SF with the following entities:
| Entity type | Entity name | Physical type | Source system | Schema |
| SOURCE | CUSTOMER | METADATA_ONLY | SF_ADVENTUREWORKS | SF_SRC |
| SOURCE | SALES_ORDER_HEADER | METADATA_ONLY | SF_ADVENTUREWORKS | SF_SRC |
| STAGE | ADVENTUREWORKS_CUSTOMER | TABLE | SF_STG | |
| STAGE | ADVENTUREWORKS_SALES_ORDER_HEADER | TABLE | SF_STG |
There will be entity mapping between source entities and staging entities. Entity Import will create the package, entities, and attributes.
With Agile Data Engine SQL Export, we can see the automatically created SQL DDL:
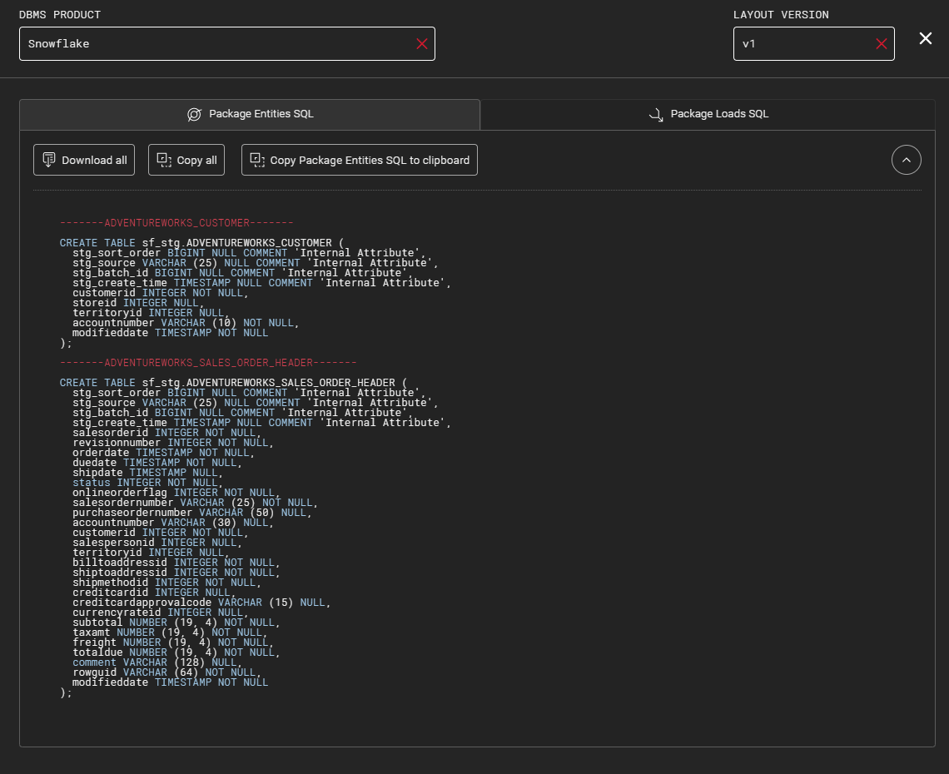
We will deep clone the package to generate the same entities for BigQuery. The deep cloning will move all the entity mappings, tables, and attributes to another package. Since we need to change the schema for all these entities, we must manually rename the created entities and schemas. The result will look like this:
| Entity type | Entity name | Physical type | Source system | Schema |
| SOURCE | CUSTOMER | METADATA_ONLY | BQ_ADVENTUREWORKS | BQ_SRC |
| SOURCE | SALES_ORDER_HEADER | METADATA_ONLY | BQ_ADVENTUREWORKS | BQ_SRC |
| STAGE | ADVENTUREWORKS_CUSTOMER | TABLE | BQ_STG | |
| STAGE | ADVENTUREWORKS_SALES_ORDER_HEADER | TABLE | BQ_STG |
Note that we will change only the source system and schema! All table attributes and table definitions can stay as they are since Agile Data Engine will transform the SQL to either Snowflake or BigQuery SQL syntax.
SQL export from the BQ package will look like this:
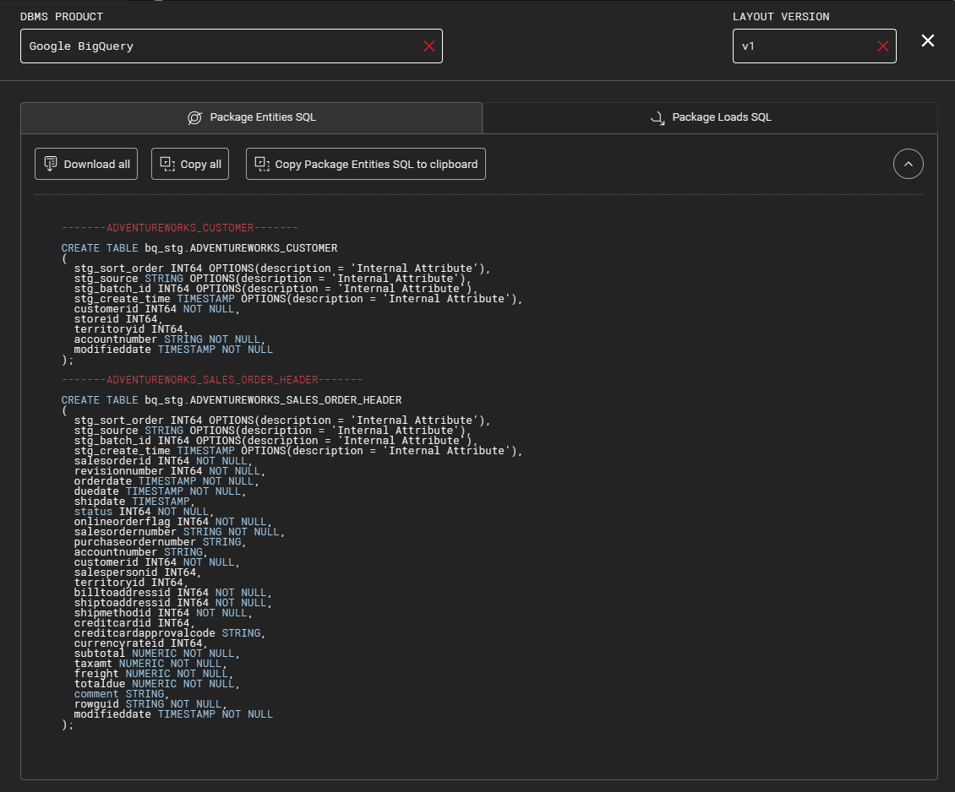
Agile Data Engine will create tables to correct target databases according to the package naming convention when committing these two packages.
We still need to add a few modifications to these entities before we are ready. The connection setup checklist mentions a need for Snowflake Storage Integration to allow COPY-commands from Google Cloud Storage to Snowflake. In Agile Data Engine, we need to add a storage integration option to Snowflake-specific staging entities when loading data with Storage Integration. For BigQuery-specific entities, we won't need to do it since everything happens with a Service account.
Notifying
In previous steps, we named the source systems SF_ADVENTUREWORKS and BQ_ADVENTUREWORKS. We use these identifiers in Notify API to tell Agile Data Engine what object from Cloud Storage it should load to which target database table. You can find more information about source data queuing in the official documentation. In a nutshell, Notify API uses Entity Name and Entity Source System as keys to match the correct object in cloud storage to the correct table in the target database.
In Google Cloud Storage, we have the following objects:
gs://demo_bucket/adventureworks_customer/adventureworks_customer.csvgs://demo_bucket/adventureworks_salesorderheader/adventureworks_salesorderheader.csv
With Notify API, we tell Agile Data Engine where we want to load these files. With Notify API, we create a manifest with the following values:
| sourceSystemName | sourceEntityName |
| sf_adventureworks | customer |
| sf_adventureworks | sales_order_header |
| bq_adventureworks | customer |
| bq_adventureworks | sales_order_header |
For each of these API POST, we will add the following request body to tell specifications about the files:
{
    "delim": "SEMICOLON",
    "format": "CSV",
    "fullscanned": true,
    "skiph": 1
}
You can use these parameters to indicate how to load the source object to the target database. Such as what is the delimiter, in which format the file is, whether it is a full table scan or delta load and whether to skip headers, for example.
Next, we will add manifest entries for each of these manifests. We use the above sourceSystemName and sourceEntityName keys and a unique manifest ID, which we got as a response when creating the manifests.
For example, for customer entity we got the following manifest id:
| sourceSystemName | sourceEntityName | id |
| sf_adventureworks | customer | 55dd666c-78e3-42c6-a391-de49a4e22015 |
For this API call, we will add the following request body to indicate to Agile Data Engine what file we want to load to which source entity:
{
    "batch": 1648128235779,
    "sourceFile": "gcs://demo_bucket/adventureworks_customer/adventureworks_customer.csv"
}
For the BigQuery table, the same applies:
| sourceSystemName | sourceEntityName | id |
| bq_adventureworks | customer | 935c00d2-30a1-41fa-91cc-fd34024ef3ca |
For BigQuery, the bucket location needs to be gs:// instead of gcs:// which is used in Snowflake. With that small change, the request body will look like the following:
{
    "batch": 1648129502144,
    "sourceFile": "gs://demo_bucket/adventureworks_customer/adventureworks_customer.csv"
}
The examples above also apply to the rest of the tables.
As a result, we have notified Agile Data Engine about which files we want to load and where. Workflow Orchestration will then load the data to the correct target tables in the correct target databases.
Data storage with Data Vault
We use Data Vault modeling to store the raw data for the Data Warehousing layer. Data Vault is especially handy with multiple source systems and when there's a need to historize all the data.
Note! In our customer case, Data Vault was efficient because there were multiple source systems from the beginning. However, since the otherwise excellent Adventureworks sample only contains one source system, this example case will not showcase all the benefits of a real-world Data Vault implementation. The Data Vault will look too much like a source system-specific Data Vault, which should not be the case in real-world Data Vault implementations.
For Data Warehousing, we will create packages DV_SALES_SF and DV_SALES_BQ for sales data and packages DV_CUSTOMER_SF and DV_CUSTOMER_BQ for customer data.
First, we will create the package for Snowflake, which we will then clone to BigQuery. The Data Model in this example will not be complete, which in practice means a few placeholder hubs (also called Stub Hubs). The first packages and their Data Model looks like the following:
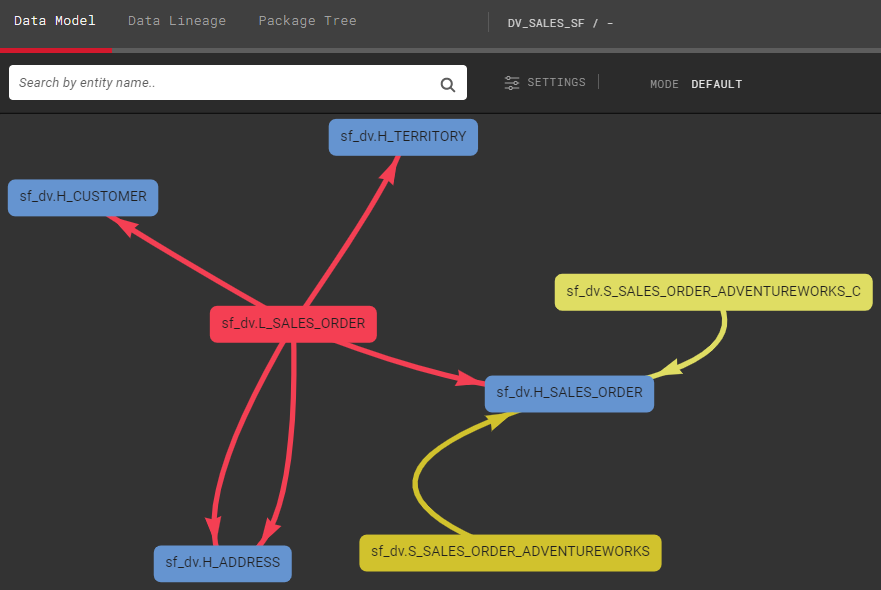
With this Data Model existing for Snowflake, we will Deep Clone the packages to create identical versions for BigQuery. The only setback in this approach is that entity mappings need to be manually changed, which means mapping BigQuery staging tables to BigQuery specific Data Vault entities, and so on. Otherwise, cloning is relatively automatic. With a few manual changes, the result for BigQuery looks the same, but it is in separate schemas.
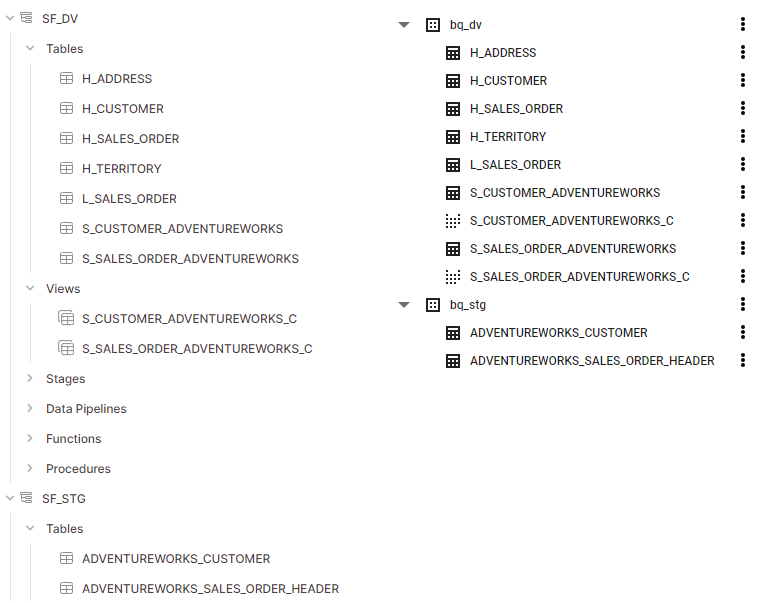
The end result in both databases looks like the following. Both databases have identical tables and views in their respective database-specific schemas:
We didn't touch any SQL with these steps since there's built-in logic for Data Vault transformations for Snowflake and BigQuery. It is possible to modify these transformations based on business requirements. In this example case, the default transformations for both target databases worked just fine.
At this point, we have identical data in both analytical databases and can move on to create a publish layer for both.
Data publish
Publish layer follows the same pattern as the previous steps. We will first do Facts and Dimensions to either Snowflake or BigQuery, then Deep Clone to another package that we will deploy to a different target database. What makes publish layer a bit different is that Fact load logic will be developer-written SQL, which means writing with a slightly different SQL dialect for each database.
Example Fact view with BigQuery SQL dialect: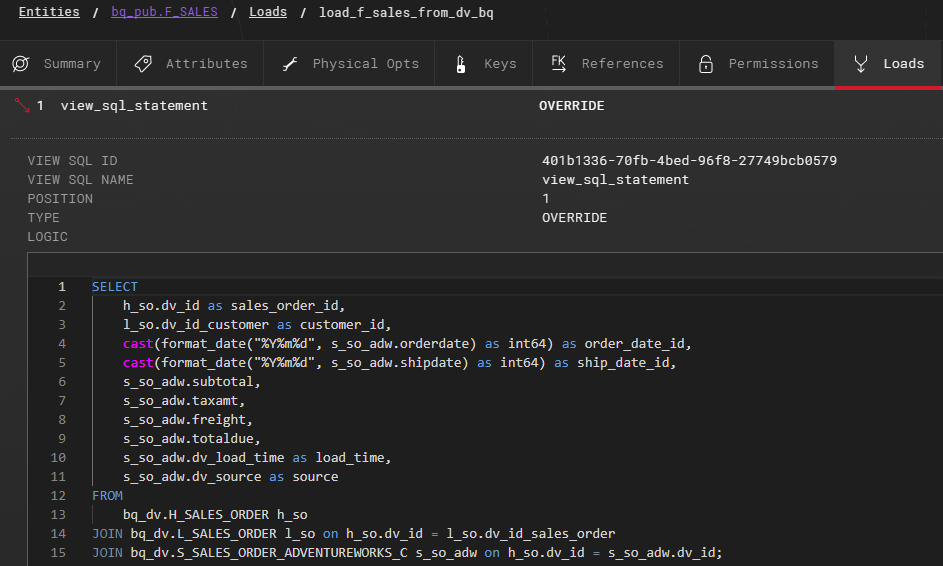
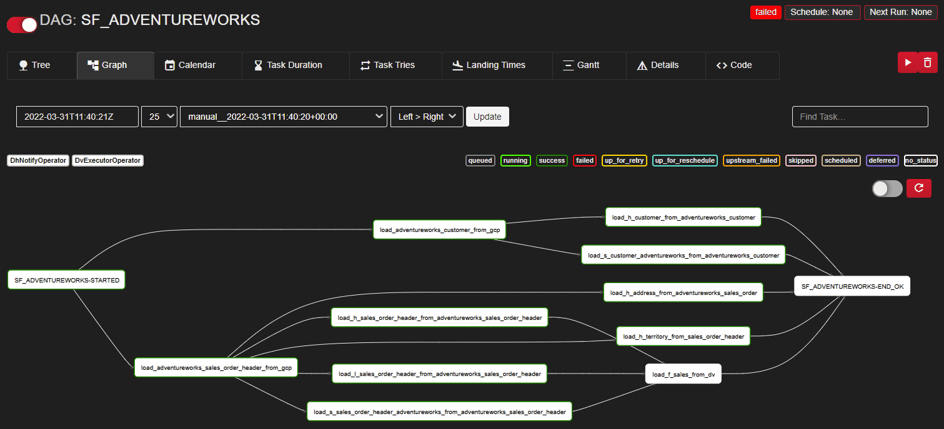
With all the pieces developed and built to target databases, Agile Data Engine has generated DAG for these loads to orchestrate correct loads to correct target tables, in the specified order:
Development wrap-up
With the previous development steps, we have created identical data pipelines to Snowflake and BigQuery. You could extend both of these solutions with additional data model structures. If this was production data, you could deploy either one of these pipelines to production with a simple button push.
On a high level, the case looks like the following:
.png?width=942&name=Blank%20diagram%20(1).png)
Final words
In most cases, duplicating the same data pipelines to multiple databases is not really a viable long-term solution since you would need a way to sync these pipelines to be up-to-date and contain similar transformations and logic. This example case demonstrates that maintaining duplicated data pipelines for multiple target databases could be tricky if there isn't any automatic sync between the two.
For proof of concepts comparing different databases, comparing the options with identical data pipelines might be good. For those PoCs, the presented duplicate pipelines would work quite nicely.
There were few manual point-and-clicks during the work, such as remapping attributes after package cloning. But in the end, changing load mappings in a few loads is quite a minor inconvenience. If there were dozens or even hundreds of load mappings to be changed afterward, things could get quite cumbersome.
This blog post also indicates how Agile Data Engine allows flexibility to change the database product afterward. For example, if you implement Agile Data Engine to one database, there's a real possibility to migrate the development to another database product, if necessary. With only developer-written SQL, the migration would be much more difficult, than migrating generated SQL with well-defined transformation logic.
In real-world cases, use-cases for multi-could target databases do exist. For example, domain-specific data platforms with well-defined integration points could benefit from this model. In those cases, the data pipelines to different target databases could be domain-specific and maintained separately, so syncing the different pipelines wouldn't be an issue. In these kinds of "data mesh" cases, built with a multi-cloud setup, utilizing Agile Data Engine for these multiple domains would help!
References
[1] https://www.gartner.com/en/doc/375973-comparing-multicloud-management-and-governance-approaches
[2] https://www.snowflake.com/blog/dont-settle-for-multi-cloud-aspire-to-cross-cloud/
[3] https://cloud.google.com/blog/products/data-analytics/introducing-bigquery-omni